
According to Digital Information World, Gmail has 28% of the global email market share. As of 2018, there were over 1.8 billion Gmail accounts. That’s a lot of users who use it for both personal and business communication.
It’s only natural that, given how busy our days have become, we look for every shortcut possible, including managing email. This is especially so if you’re a small business (or a SOHO) without the extra staff to make the daily grind a bit less mired in a deluge of email.
If your inbox is overflowing with emails awaiting replies, or if you are overwhelmed with having to send out a large number of mails, you might be wondering – what can you do to make this process a bit more efficient?
You can make use of the Gmail template feature. With it, you can create numerous email templates, and use them for both new emails as well as replies. What’s best, the Gmail template tool is free to anyone with a Gmail account. So even if your IT staffing service makes use of the free version of Gmail, you’ll have this tool at your fingertips.
What You’ll Need
The only thing you’ll need to make this work is a Gmail account. You should know, however, that you do have to work with Gmail’s built-in templating feature from within the web-based Gmail client. In other words, you won’t be able to work with templates if you use a desktop client such as Thunderbird or Outlook.
Creating a New Template
The first thing you have to do is create a template. You can make as many templates as you need. For example, you could create a number of templates, each of which could serve a specific purpose, such as welcoming a customer or sending offers. Or you could create specific templates for specific clients.
The content of your templates is completely up to you. How you create the templates, however, is not.
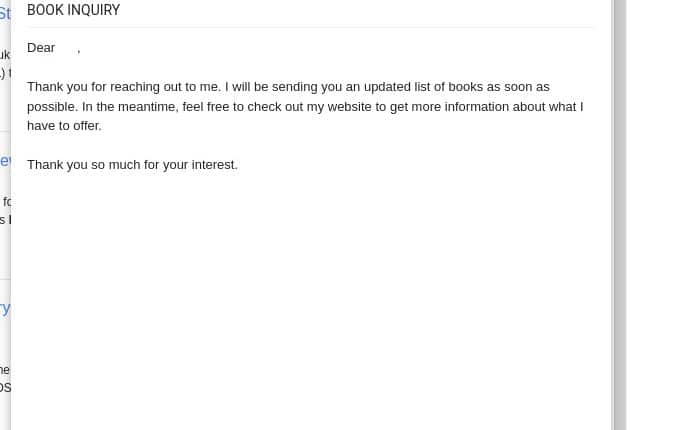
In order to create a Gmail template, log into your Gmail account. From the Gmail main window, click the Compose button. In the email composing window (Figure 1), build the template exactly how you want it — including text, formatting, images, etc.
Figure 1
The Gmail compose window.
There’s one thing you should know about the body of the template. If you have an automated signature for every outgoing email and reply, you’ll want to delete it from the template. If you fail to do this, you’ll wind up with a duplicate signature that you’ll then have to remove when you use a template.
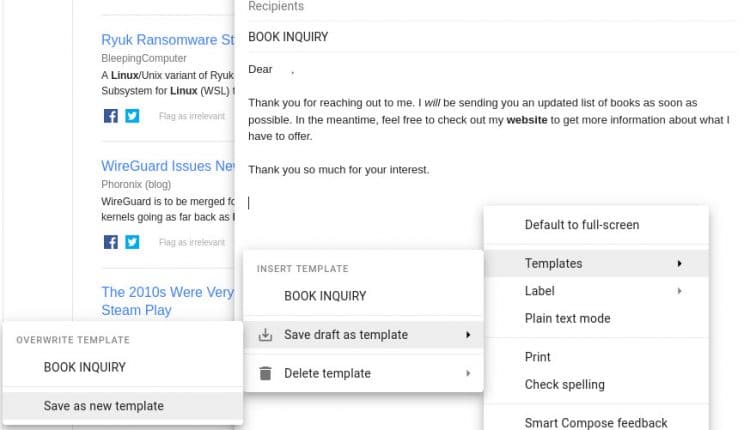
After you’ve composed the email, it’s time to save the template. To do this, click the three vertical dots at the bottom right of the compose window. From the popup menu (Figure 2), click Templates > Save draft as template > Save as new template.
Figure 2
Saving a new template.
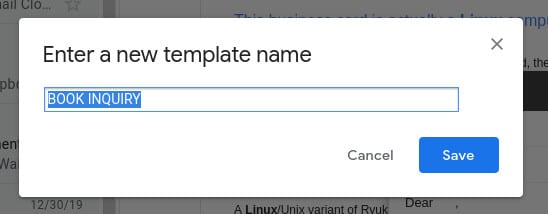
You’ll be asked to give the template a name. Type a name and click Save (Figure 3).
Figure 3
Naming and saving your new template.
That’s it, your new template is ready. Create as many templates as you need, saving each with its own unique name.
Using Your Template
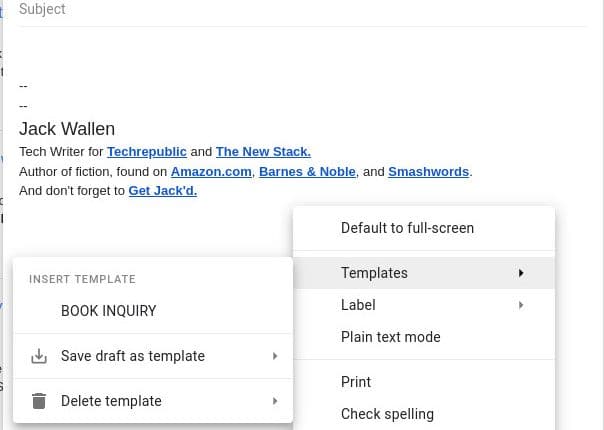
Now it’s time to use a template. This is quite easy. Go back to Gmail and click the Compose button. In the compose window, click the menu button (three vertical dots in the bottom right corner) and then click Templates. From the submenu popup, select the template you want to use (Figure 4).
Figure 4
Selecting a template for your email.
Once you select a template, the body of the email will automatically populate with its contents. As stated earlier, the signature for your email will already be there, so you don’t have to add that after the fact.
With the contents of the template in place, you can then add the recipients for the email, as well as a subject. When creating your template, you can save a subject, if you are certain you’ll need the same information every time you use that template. You can’t, however, save recipients to the template as those will be deleted each time.
It is also not possible to save attachments to a template. And if you want to include an image within its contents, you’ll have to do so in-line, not as an attachment.
You can also use these same templates in reply emails. This makes it really handy if you have a regular response you use for certain email replies. You can add a template to a reply email in the same manner as if you were creating a new email.
Simply click to reply to the email and then click the menu in the bottom right corner of the compose window and click Templates. Select the template you want to add to the reply and you’re good to go.
Conclusion
And that’s how you can use the Gmail template feature to help make your experience a bit more efficient. Once you’ve dialed in your templates, you’ll find Gmail far more productive and email a bit less of a hassle.